Share
Pin
Tweet
Send
Share
Send
To build our mini refrigerator, we need to find or buy a Peltier element, what it is and how it works, you can read below, and two radiators.
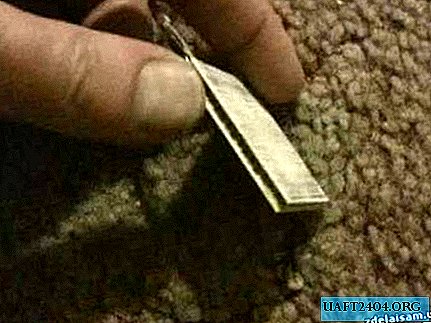
This is the same Peltier element, I tore it from a broken computer, it stood between the processor and the cooler there. I cleaned the old thermal grease from it. In a nutshell - this Peltier element when it is supplied with direct current starts to work as follows - one side of it starts to heat up, and the second cools down, if you change the polarity of the power source, then the sides of the element will behave the other way around!
Next, I took two massive radiators from an unnecessary amp. Then he greased the element with the new thermal grease that he bought in the radio store, and squeezed the Peltier element between the radiators. The use of thermal paste in this case is mandatory!

I connected the wires to the element from the USB cable and stuck it in the computer - one radiator started to warm up, and the second one cooled down! everything means a bunch!
Next, I glued here such an interesting case!

The material from which I glued the refrigerator is similar to pressed foam or porous plastic. In general, the material can be anything, its main quality is thermal insulation.
Glass is organic, it looks quite fragile, but in fact the material is durable.
Glue - superglue.
Then for convenience I made a fastener on magnets.

It turned out fine - a bottle of mineral water gets into it calmly, and what else will save on a hot summer day ?! :-))

My next step is the fridge moding table!
I printed my favorite web page on a transparent sheet and stuck it on glass! Then I mounted an LED inside and powered it from the same USB cable. that's all!

It turned out super!
Good luck to you!
P.S. Instead of large radiators, you can use small radiators with coolers - this will be even a little better in size and cooling!
Share
Pin
Tweet
Send
Share
Send