Share
Pin
Tweet
Send
Share
Send
- plywood or other board with a thickness of about 4-8 mm;
- ruler;
- a pencil;
- jigsaw or saw;
- ceiling plinth;
- knife;
- varnish for yachts and a brush;
- gypsum putty;
- art acrylic paint;
- sponge for acrylic paint;
- glue;
- stationery buttons;
- newspapers.
Stages of Robots:
1. First of all, you need to measure what size frame you need. To do this, add a few centimeters to the size of your product, photo or picture (depending on the width of the baseboard).
2. On plywood, draw with a pencil the perimeter of the future frame.
Use a jigsaw (saw) to cut the base for the frame. This work is best done on the street or covered with newspapers, as many sawdust will fly away, and it is difficult to clean them from the carpet and other surfaces in the room.

3. Cut the ceiling of the skirting into 4 cuts that will fit the cut frame in size. Be careful and accurate, the baseboard is made of a fairly fragile foam. It should be cut with a sharp knife on a flat surface, without pressing hard on the surface of the baseboard.

4. Fold all the cuts to the base of plywood and mark on the baseboard how many need to be cut so that the angles converge evenly and without large gaps.

5. Fold the prepared sides of the future frame together and check whether they correspond to the size of the base and the picture.

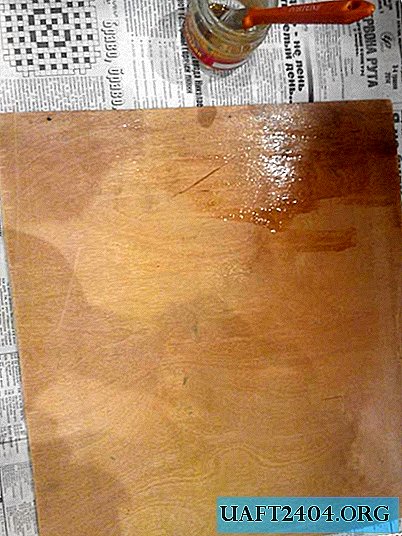
6. For ease of use, the plywood base should be coated with several layers of varnish for yachts. This will protect your product from dust and deformation.
7. Cover the table or other surface with newspapers. Lay out the baseboard as it will be located on the future frame.

The places where the baseboard does not meet, cover with gypsum putty. It will also help to firmly fasten the baseboard together.

8. It is necessary to work with putty very carefully. It is important not to damage the pattern of the plinth itself and in the joints (at the corners) try to connect and continue the pattern. Leave the baseboard to dry overnight. Do not worry if at first the putty seems a little yellowish, the dry gypsum putty becomes pure white.

9. We proceed to the stage of staining. Prepare for yourself an acrylic paint of the required color, a sponge (a sponge is the best choice for painting a ceiling plinth with various patterns, since it does not leave stains and simplifies painting) and a palette (you can use a small lid or saucer instead of a palette).

If you have a limited amount of paint and are worried that it may not be enough, then acrylic paint can be diluted with ordinary PVA glue in a 1: 1 ratio. To achieve the best effect and brightness, it is best to paint the frame in two layers. The paint will dry out no more than 2-3 hours.

10. Fix the picture on the base with glue or push pins.

11. Glue the finished frame to the base of plywood and leave to dry.

12. On the back wall make a loop and ... Voila! The picture on the wall is ready!
Share
Pin
Tweet
Send
Share
Send