Share
Pin
Tweet
Send
Share
Send
Green and red yarn 50 g each (length 100 g - 250 m).
Hooks number 3 and 4.
We knit the main pattern according to the scheme, where a row of double crochet and fluffy columns is knitted with red yarn. It will be a strawberry. And the next row is knitted with green thread s / bn. These will be the leaves.

Headband.
Step 1. A chain of v / n is crocheted with a No. 4 green thread. Its length is equal to the size of the head. However, do not forget that the number of loops must be a multiple of 4 according to the pattern repetition. I scored 120 v / p.

Step 2. Change the hook to number 3 and knit a row with s / sn, not forgetting to make loops for lifting at the beginning of the row. We connect the circle with a connecting loop.

Step 3. Change the thread and continue in the same direction. Two w / p, * 2 / sn in the first 2 loops of the previous row, a lush column with 5 double crochets, 1 s / sn *. We continue this drawing to the end of the circle, 1 s / sn and connect the row with a connecting column.
Step 4. Change the thread. Rise from 1 high point, * 1 single crochet to the first loop of the row, knit a cluster (stretch the loops between the yarn of the strawberries, leaving them on the hook until we collect 5 and knit them together), 2 s / b in the next two loops of the previous row *. We continue to the end of the circle, connect it.

So the mating looks closer.

Step 5. Change the thread, make 2 v / p and in the same base * we knit a lush column, 2 s / sn in the next 3 loops of the row *. Continue ** to the end, connect the circle.
Step 6. Change the thread. Lift loop, * cluster of 4 unlinked s / bn between the strawberry loops, 3 s / bn in the following loops *, to the end of the row. Connect the circle.
Step 7 and step 8 fit like step 5 and step 4.
Step 9. Two high-rise, s / sn in each loop of the previous row. Break off and hide the thread. You can try on a bandage! If it is too big, just stretch inside her ribbon or thread.

And here she is already on the head of my princess.

Handbag.
We begin to knit a bag with the bottom with green threads. What size do you like. You can tie a big bag. It is possible less. The number of loops in a row will depend on this. The main thing to remember! The multiplicity of the number of loops around the circumference of the bottom should be equal to four.
I crocheted the 21 w / n crochet No. 4, changed the hook to No. 3, and in each loop of the chain I knitted one s / s on both sides, in the final loops 4. Each circle closed and it turned out 48 s / s.
The thread changed and began to knit according to the main pattern. In the first round, 12 strawberries turned out.

We knit the second circle in a checkerboard pattern. Again in the main drawing.

We knit such rows with strawberries 8.

We bind them with s / n green thread.

For beauty, you can make a number of scales.

We knit the handle for the bag like this: we collect 6 w / p, connect and continue knitting in single crochet columns in each loop of the row.

At both ends of the handle we knit red yarn 12 s / sn and close them in a circle. We fix the handles in the bag through the hole between the posts.
The handbag is ready.
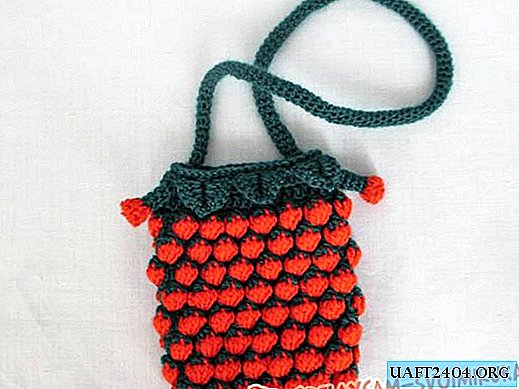
Here we have such a cute kit.

Share
Pin
Tweet
Send
Share
Send