Share
Pin
Tweet
Send
Share
Send
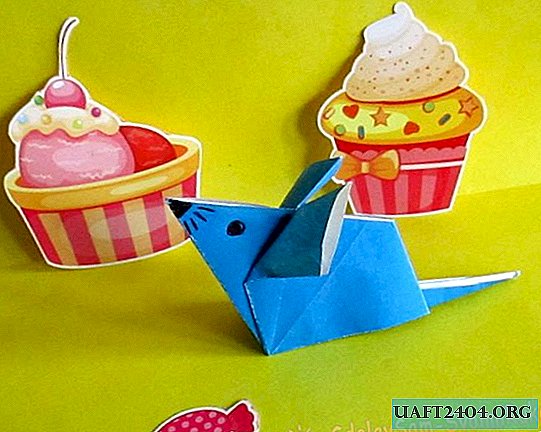
To familiarize yourself with this rodent, invite your child to make a paper mouse. Most likely, he will be completely delighted with this venture!
The assembly diagram of the mouse is simple, so even a preschooler (with your help, of course) can easily cope with this interesting task.
For crafts, you will need a square sheet of single-sided or double-sided colored paper in a suitable color.
Paper mouse folding sequence
Prepare a square sheet of paper.

If the paper is single-sided, turn it upside down with the white side. Fold in half diagonally and then expand.

Fold the top and bottom sides of the square to the middle, folding both sides in half diagonally. You will get a rhombus.

The short sides of the rhombus also bend diagonally to the middle. Iron the bends.

Return the just bent parts of the workpiece to its original position.

Grasp the corner of the sheet, bend it to the left, connecting the upper and lower sides of the paper together. You should have a right angle at the bend.

Gently iron the top of the sheet by folding along the dashed line and along the already finished fold to the right.
The upper part of the leaf should neatly lie on the bottom in this way.

Fold the opposite side of the workpiece as well.
In the middle of the craft, two moving triangles are formed, on each of which a fold passes through the top to the edge of the leaf.

Wrap half of the triangle on this fold inside the craft.
In this case, the edge of the bent part will look out.

With the second movable triangle, do the same.
After that, in the middle of the workpiece you will have a small ledge, consisting of two small triangles. These are future mouse ears.

To form the head of the mouse, bend the left side of the elongated rhombus inward approximately 2/3 of the length (along the dashed line).

Draw a line from the center point of the workpiece to the top corner. Do the same from the opposite side.

Bend the shaded parts of the part under the craft.

Fold the workpiece horizontally in half.

Bend the upper part of the moving part to the right at an acute angle (as shown in the photo).

Spread the edges of the part in the form of a pouch, forming an eye. Make the second eye the same.
Decide on the length of the trunk and tail of the mouse. To do this, draw a line parallel to the left edge of the workpiece, retreating about 1 cm to the right of the bend located across the craft.

Bend the right side of the craft in a dashed line to the left.

Return to starting position. Twist it in folds.


Bend the sharp long part of the craft (future tail) to the right, bend 3/4 of its length between both sides of the folded figure so that you can draw a straight line along the base of the craft to a sharp corner in its right part.

Bend the lower protruding part of the figure inward. In the photo she is hatched
The mouse is almost ready.

It remains only to draw a muzzle to the mouse.

Here is such a funny and curious mouse turned out from one piece of paper!
Share
Pin
Tweet
Send
Share
Send