Share
Pin
Tweet
Send
Share
Send
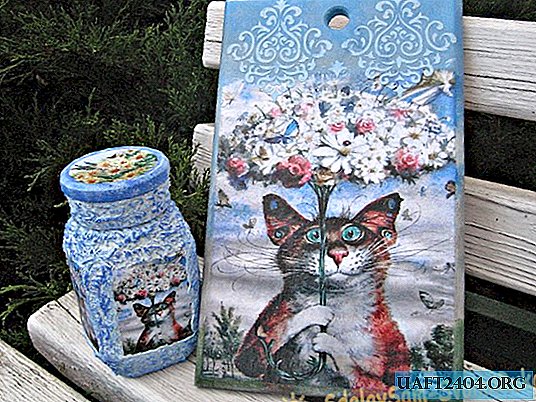
Every housewife wants her kitchen to be not only functional, but also beautiful. And you can decorate the kitchen with items decorated with your own hands. So to decorate the kitchen you can make a bright set, which will consist of a board and a jar. We will decorate both objects using decoupage technique.
Will need
For work, you need materials:
- The board is wooden.
- Glass jar.
- Acrylic paints.
- Sandpaper.
- Acetone and cotton wool.
- Synthetic brush.
- Palette knife.
- Putty.
- Stencils.
- Skewer.
- Printouts.
- PVA glue.
- Scotch.
- Acrylic lacquer.

Decoupage boards
1. At the first stage, it is necessary to prepare the surface of the board for further work. To do this, we skin the board on the front side.

2. Priming the board with white acrylic paint in 2 layers. Each of the layers of paint is skimmed.

3. Prepare a printout. To do this, cut out the picture along the contour.

4. Thin out the printout. At the same time, we turn the picture on the wrong side to us and glue it with tape.

5. We invite tape with a plastic card.

6. Take the tape over the edge in any corner. Slowly remove the top layer of paper.

7. The result is only a thin layer of paper with a picture.

8. Proceed to gluing the picture. To do this, lay out the printout on the file with the image down and wet it with water.

9. Lubricate the surface of the board with glue. Then we put a file with a picture on the board.

10. We invite the picture to the board, remove the file.

11. Top the picture with glue.

12. When the glue in the picture is completely dry, you can color the edges of the board and paint on the background.


13. Apply a three-dimensional drawing to the board using a stencil. To do this, tint the putty in blue and apply decor through the stencil.

14. Finally, all work is covered with acrylic varnish in several layers.

15. The board for the kitchen is ready!

Decoupage cans
1. Prepare the working surface of the jar. To do this, use acetone to degrease the jar and lid.

2. Prime the product with white acrylic paint.

3. We prepare 4 pictures for the decor of the cans and 1 round picture for the decor of the lid. We cut out prints to the size of the sides of the can and thin them.

4. Glue pictures of the cat on all sides of the can.

5. We glue a round picture with flowers in the center of the lid.

6. Next, paint the putty in blue. Then putty on the jar around the pictures. Then we make an arbitrary pattern on the putty with a wooden skewer.


7. The bottom of the lid is also decorated with putty.

8. When the putty is dry, apply blue paint to the volumetric elements of the can using the "dry brush" method.

9. The bottom of the lid is also darkened with blue paint. Draw the top border around the picture in blue, and then lighten it a bit with white acrylic.


10. Finally, the jar is varnished.

11. Decorating the jar is complete!

The kitchen set is ready for use!


Share
Pin
Tweet
Send
Share
Send