Share
Pin
Tweet
Send
Share
Send
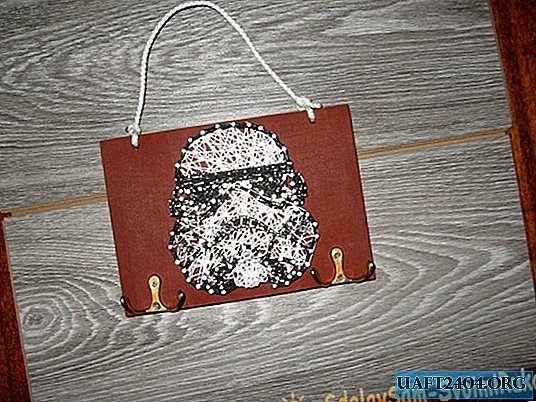
Today I would like to talk about an unusual and beautiful hanger, which will appeal to all fans of "Star Wars" and not only. It is made in the technique of string art. This type of art is becoming increasingly popular and crafts made in this style can cost a couple of thousand rubles. Although in reality there is nothing complicated in their manufacture. And such a craft can do any person who is able to hammer a nail into the board. Getting to work.
Will need
To make this craft, we need:
- A board that will serve as the basis for future crafts. It is important that the thickness of the board you choose is more than one centimeter.
- Varnish for wooden products. But if you are satisfied with the color of the board, then you can do without it.
- The image you have chosen will be performed using the string art technique.
- Scotch tape or electrical tape.
- Nails
- Knitting. The number of colors you choose.
- Hooks for clothes.
- A couple of screws for hooks.
- Strong rope.
- Hot melt adhesive may also come in handy.
Making clothes hangers in the style of STAR WARS
To begin with, we find on the Internet an image for manufacturing. Best for kids coloring. It is important that the image is large and not very complex (it is better not to choose images of people). Next, print it on the scale you need and find a board of suitable sizes.

Now begins the stage of processing our foundation. Carefully process the edges and planes of the base to avoid splintering. Then apply varnish and leave the base to dry. After the varnish has completely dried, we mark the place for the image, with the expectation that there will be a place for hooks. Now using tape or tape we attach the printout of our image to the base.

On the printout along the contour of the image with a pencil, mark the places where you will hammer nails, and then pierce this place with an awl.

It is important that the nails are not too close to each other, so it is better to retreat from each notch a distance of one centimeter or more. When the marking is finished, carefully remove the printout from the base. It is time to hammer in nails. So that the nails are located at the same depth, you can cut a strip from thick cardboard or plastic, the height of which will be the distance at which the nail head will be above the base.

If you use too long nails, then make sure that the nail does not pierce the board through, otherwise our craft on the reverse side will not look very presentable. After you hammer all the nails, you can use the screws to attach the hooks to the base, or do it at the end (make sure that the length of the screws does not exceed the thickness of the board). Now we begin to fill the future image with threads.

To do this, we attach a thread to any nail and for reliability, this assembly can be fixed with hot-melt adhesive. Next, we draw this thread to the opposite end of the image, where this color is still there, circle the thread around the nail and move on to the next, so we fill the areas with the desired color.

If you think that the area is already filled enough, then cut the thread and tie it with a knot on the nearest nail. When you fill the image areas with the necessary colors, at the very end you need to make the image contour with a black thread, this is necessary in order to make the image clearer, and to differentiate the areas of different colors. Image is ready. Now you can think about how to mount our crafts on the wall.

I did this in the following way: I took the rope, measured the required length, drilled two images at a certain distance from each other at the top of the craft, with a diameter greater than the thickness of the rope, threading the thread through the holes and tying it with a knot, I got a simple hanger that can be hung on any self-tapping screw in the wall.
Also, to make the craft more beautiful, one could stick a star-shaped glitter or a STAR WARS logo sticker on the base.
Share
Pin
Tweet
Send
Share
Send