Share
Pin
Tweet
Send
Share
Send
It's no secret that the tablet’s battery is very energy intensive. Otherwise, how to “feed” such a giant, having a large screen, powerful speakers and no less powerful modules Wi-Fi, Bluetooth and GPS ... It is very unpleasant that these devices break more often and faster than other, not so useful and interesting gadgets. A fairly common cause of failure is a crushed screen. Due to its considerable size, it is he, as the most fragile part in the entire structure, that is subject to external mechanical stress. A simple fall from the hands of a clumsy owner ... and whoever manages to sit on it will manage. It was such a crushed tablet that they brought to me recently, for spare parts.

The device, according to its owners, was not even a month old. Ordering and buying a new screen, as well as paying the wizard for replacing the screen, almost doubled the cost of the tablet itself, because its owners prudently refused this idea. However, even from a broken tablet you can extract a lot of useful and necessary things, and one of them is batteries. It is from these practically new batteries that I propose to assemble an external charger. Most tablets of this type usually have paired lithium batteries. Each of them has 3.7 volts at the output and 7000 mA * h. By connecting these two batteries in parallel (plus to plus and minus to minus) we get the same 3.7 volts at the output, but the capacity of such a double battery doubles - up to 14000 mA * h. These are very good indicators for the average external charger. 3-4 times you can safely charge even the most modern smartphone. The most problematic in this venture was to work out the case. Well, I had to order a charge controller for lithium batteries over the Internet. I ordered not the cheapest, but not very expensive - average.

The package arrived pretty quickly.
Will need
- Batteries from the tablet.
- Charge controller for lithium batteries.
- Soldering iron, tin and flux.
- Double adhesive tape.
- Thin wiring (preferably black and red).
- Scissors.
- Second glue and soda.
- A sheet of plastic (1.5-2 mm thick).
- Burner.
- Colored adhesive film (for decorative cladding).
- Flat screwdriver.
- Ruler and marker.
- Needle files.
Power Bank manufacturing
So, first you need to remove the batteries from the broken device. Using a flat screwdriver, remove the cover from the tablet. Disconnect the plug of the charge controller, to which the batteries are soldered, from the tablet board and remove the batteries with the controller. We remove the batteries from the controller and remove the controller - maybe in the future it will do.


The main and, in my opinion, rather tedious job is to design a building. We’ll start with him. I picked up a suitable plastic thickness, I got down to business.

We measure the length and width of the battery, not forgetting about the additional space for the new charge controller and, using a ruler and marker, transfer the parameters to a plastic sheet.


The thickness of the future device is determined based on the thickness of the most voluminous part of all components.

Next, we cut the blanks with a red-hot stinger of the burner.

It was possible to cut all this strictly along the drawn lines and then simply remove the melted edges with a file, but I decided to save time and cut it off with small margins so as not to scuff the file later. I just took powerful scissors and trimmed the plastic blanks along the lines ... So, the shell blanks are ready.

Now on one of the front ends we mark with a marker where the input and output connectors of the device will be located. Again, with a burner, we cut out approximate holes, and bring them with a thin file.

Now we will prepare the battery. Namely, we glue one to the other evenly, using double adhesive tape, solder the contacts in parallel - plus to plus, minus to minus (here you need to be extremely careful!) And solder to the soldered contacts of the wiring. Red plus, black minus. This is to avoid confusion.


Now, using a second glue and soda, we glue the charge controller to the corresponding holes in the previously prepared end wall of the case.

Next, we’ll deal with the indicator. There is no on / off button on this controller, and there is no display showing the charge level. Instead, there are two microdiodes - blue and red. Red blinks when the device itself is charging, and glows steady when charging is complete. Blue, it glows evenly when the device is charging any gadget, and turns off when the recharged gadget is fully charged. To bring this indication out through the deaf and opaque plastic, I made a hole in the top cover of the case, in the approximate location of the indicators. Then I pasted into this hole a diffuser of light from a camera flash (picked out from the same tablet). It turned out a very good and accurate indicator.

Now we glue the end with the controller glued into it to the bottom cover of the case and glue double tape on the inside (bottom).

We put the batteries on the tape and solder the plus and minus wires to the corresponding controller terminals (terminals B + and B-). It is important not to reverse the polarity, otherwise the controller will burn out instantly - there was already a bitter experience ...

Next, we collect the rest of the body together, gluing everything with second glue.

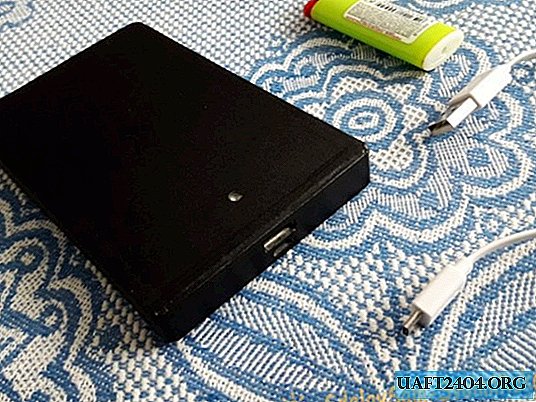
It remains a little; file all the sticking out and sharp corners from the ends with a file, treat with a rough sandpaper, and glue the product with adhesive film of any color you like. For example, I pasted black matte.

In the Power bank store, with such a charge capacity, it costs a lot, and in our case, it cost us the price of a charge controller ($ 2) and a couple of hours of work ... Moreover, it turned out to be no bigger and thicker than the charger from shop, factory assembly - palm-sized, but very energy-intensive.

If you connect a USB splitter to it, it can very much help you and a few others, during a long trip, camping, or when the power is cut off on time, for example, repair.
Share
Pin
Tweet
Send
Share
Send