Share
Pin
Tweet
Send
Share
Send
As you can see, these are rather big products, both in weight and in cost. Is it possible to make a sandblasting device for 1-2 liters from improvised materials, spending a minimum of money? This is quite possible, especially if there is a spray gun at hand.
In everyday life, they can be used to clean rusted metal tools and parts, elements of metal gates before painting, remove dirt from the surfaces of house and garden paths, tiled or cemented.
The process of manufacturing a simple sandblasting machine
We give step-by-step instructions for the manufacture of sandblasting homemade, working on the principle of an ejector (atomizer).
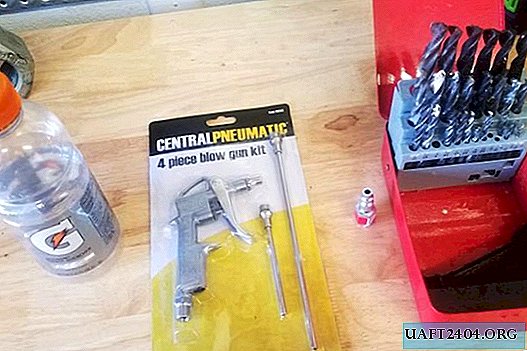
Step 1. You need to buy or borrow a pneumatic gun designed for pressure up to 4 MPa, a plastic 0.5- or 1-liter bottle, fitting, hoses and drills. We will mention other materials and tools as they are applied at the appropriate step.
Step 2. We twist the cork from the bottle, and cut the remaining lint on the neck with a carpenter’s knife and remove it. Screw the lid tightly into place.

Step 3. Using an electric drill and a 5 mm drill, drill the neck of the bottle in diameter on both sides directly under the cap itself.

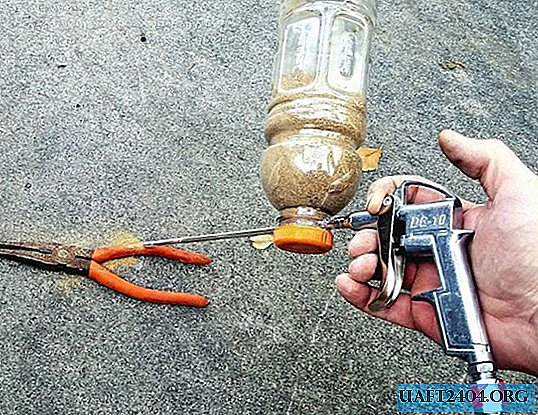
Step 4. Carefully insert the tube from the kit to the air gun into the drilled holes. We determine on it the place where the bottle with sand will be located. It should be closer to the air gun. This will provide greater reliability of the design, better balancing and ease of use.

Step 5. Pull the tube out of the holes in the bottle and mark with a marker on the tube the place where the oblong hole will be sawn for the sand to enter from the tank.

Step 6. Using a file for metal, we perform an oblong, narrow hole on the tube, gently scraping its edges.


Step 7. Once again, return the tube to its place, and the hole cut by the file should be directed downward, and a bottle will be placed vertically upward above it.


Step 8. The places of entry of the tube into the bottle and exit from it are filled with suitable glue, firstly, to ensure the strength of the connection, and secondly, to seal so that during operation of the sandblasting device the air supplied by the compressor does not come out.
After waiting for the glue to harden completely, you can start testing the sandblasting apparatus by first pouring dry sand with a grain size of no more than 0.5 mm into the bottle and using a hose to connect the gun with a compressor that is able to provide a pressure of 4 MPa (bar).

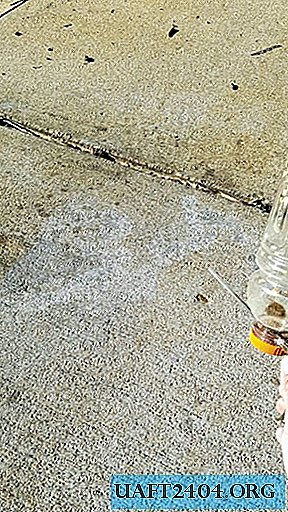
Step 9. We direct the gun tube to the dirt of the garden path, adjusting the air pressure, and hence the sand flow, using the handle on the tool. The cleaning efficiency is obvious.

Step 10. We will try to clean the pliers that were lying somewhere for a long time, being exposed to water or humid air. By sending a jet of air mixed with sand to rusty places of the instrument, we achieve its complete cleaning. The surface of the metal after such a treatment acquires a noble matte shade.


For information: a household air compressor was used as a source of compressed air, on the control panel of which there is an air flow adjustment knob, a flow meter, fittings for connecting hoses and a manometer showing the pressure in the system.
As a means of cleaning, along with fine sand, you can use finely divided shells of walnuts.

Work safety
Particles of sand or its substitute fly out of the nozzle of the sandblasting device at a speed of tens of meters per second and, reflected from the surface being cleaned, can damage unprotected parts of the body, especially eyes and hands.
Therefore, when working with a sandblasting apparatus, it is necessary to use personal protective equipment: glasses or a shield, a respirator, gloves, clothes with long sleeves. It is advisable to carry out the work outdoors or in a room with efficient supply and exhaust ventilation.
Original article in English
Share
Pin
Tweet
Send
Share
Send