Share
Pin
Tweet
Send
Share
Send
Sometimes, due to damage, it is necessary to dismantle the old window sill, and install a new one. Some at one time did not order a window sill with plastic windows, but later decided to install it. Now we will look at a step-by-step guide for installing a plastic window sill. Moreover, this work is quick and not complicated. You can do it yourself, saving money.
Proceed to install the windowsill
The first thing to do is to remove the unnecessary. For example, dismantle the previous window sill, and also use a puncher to hollow out the grooves so that a new window sill can be inserted into them.


The depth of the grooves can be different depending on the length of the window sill, as well as on how much it is possible to complete these grooves. Typically, the ledge of the windowsill is 5 - 10 cm.
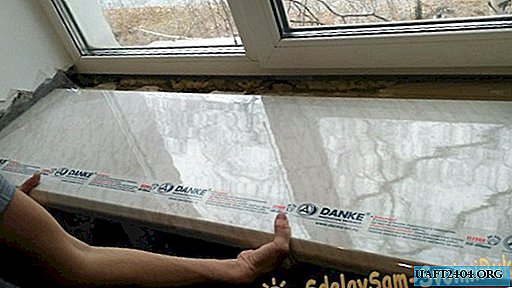
Next, measure the length of the window opening, taking into account the grooves. For this you need roulette. For this size, cut off excess from the windowsill, using a jigsaw. To make the angle you cut 90 degrees, use a pencil with a square.


Having cut off the excess, try on the windowsill.
If it does not enter, then it is necessary to clean the grooves with a punch. Note that when measuring it is important to consider the side plugs that are attached to the windowsill.


Prepare construction foam by stirring it according to the instructions on the can.

The window sill itself is attached from the outside of the window. First you need to dismantle the tides, which are usually mounted on self-tapping screws. Then, on the inside, twist a few self-tapping screws indented 30 - 40 cm to make marks. A self-tapping screw should come out on the other side. Thus, from the outside you will already have holes in which you will screw the screws to secure the window sill.


When you screw the screws into the windowsill, immediately screw the ebb screws into the same holes in which they were fixed.

When the window sill is installed on the self-tapping screws, as well as the mounting foam, it is necessary to repair the irregularities that were formed during installation. To do this, knead the required amount of putty to seal the joints. The main space of the side grooves can be covered with mounting foam, and then puttyed to even out the slopes.


Also in the lower part of the window sill, it is necessary to eliminate the gaps between the wall and the window sill, using mounting foam and putty. Since the space between the window sill and the radiator can be small, this creates difficulties for sealing irregularities. Therefore, some install a special film to reflect heat, thereby increasing heat transfer, as well as closing irregularities formed during the installation of the window sill.


When the putty dries, it must be wiped with a special sandpaper to level the surface, and make it smooth.


Next, paint the slopes. It is best to paint the slopes completely, and not just the parts that you putty on, since even the same color may differ and stand out against the general background. This is convenient to make with a roller.

When you complete the installation of the windowsill, remove the protective film. If you do not remove it for a long time, it will subsequently be made much more difficult.

Why is it better to do this work yourself? For 1 running meter, the master can evaluate the work at 1000 rubles, depending on the terrain. Of course, in the capital, or in other large cities, this cost may be higher. But in fact, this work is simple, and it can be completed in just a couple of hours.
Share
Pin
Tweet
Send
Share
Send