Share
Pin
Tweet
Send
Share
Send
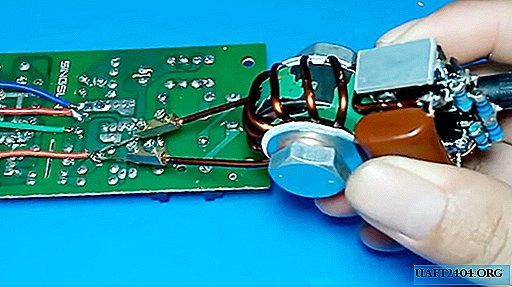
This device is made according to the "push-pull oscillator." The main element of the soldering iron is a transformer, the secondary winding of which is made of a single coil of thick wire. The ends of the coil are closed through a thin sting, because of which, this section is heated.
To make a pulse soldering iron we need:
- ferrite core;
- 2 resistors at 470 ohms;
- 2 resistors per 10 kOhm;
- 2 rectifier diodes 1N4007;
- 2 field effect transistors IRFZ44;
- 22 nF capacitor;
- inductance (inductor) 47 μH;
- power button;
- copper wire, 2 mm thick;
- power supply connector;
- metal terminal blocks;
- bolt, nut, 2 metal washers, 2 washers of insulating material;
- clip.

Let's proceed to the assembly of a pulse soldering iron:

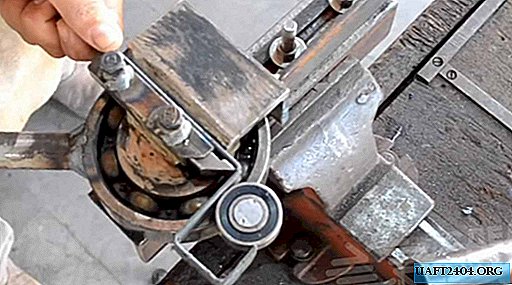
1. First we make a transformer. For this we need a ferrite core and a 2 mm thick copper wire. We make 12 turns of wire.

The ends of the winding are removed and cleaned.


2. Field effect transistors in this circuit may overheat.

Therefore, they must be connected to the heat sink. As a radiator, you can use any metal part. For the compactness of the device, the heat sink can be used as a skeleton circuit. Around him we collect the main radio components. Solder resistors, diodes.

3. Solder the ends of the transformer winding and the capacitor to the resulting board.

4. On the reverse side, glue the power button and connector. Then solder. The power button should be without locking. That is, the soldering iron will work when the button is held in the on position. This is done so that with a long power-up the entire transformer will warm up and it will be problematic to hold the soldering iron in hands.


5. Find the center of the winding and solder the inductor.


6. We collect the secondary winding. From the wire, 2 mm thick, we draw two conclusions.

The ends are cleaned from varnish. On one side we make rings for the diameter of the bolt.

7. We put one of the wires on the bolt, then a metal washer, insulation. We put a bolt into the hole of the transformer. Dress insulation, washer, second contact. Clamp with a nut.


8. We cut off the paper clip to make a convenient sting.

And we connect to the terminals of the secondary winding using terminal blocks.


9. Connect the soldering iron to the power source. We check the performance.


Note
You can connect a pulse soldering iron from various power supplies up to 12 volts. It must be borne in mind that the higher the voltage of the unit, the greater the power of the device and the faster it warms up.
This soldering iron can be made powered by rechargeable batteries or batteries. In order to achieve a voltage of 12 volts, the batteries must be connected in series. Soldering iron - the device is very powerful, so for a long time it will not work on batteries. However, due to the rapid heating for small amounts of work, it is quite enough. The main thing is not to forget to turn it off.

Safety precautions
- When connecting the soldering iron to the power source, observe the polarity.
- After assembling and checking the operability, it is better to hide the soldering iron circuit in the case.
- Do not forget to unplug the device after use.
Share
Pin
Tweet
Send
Share
Send