Share
Pin
Tweet
Send
Share
Send
Shkantovye connections are very popular among joiners, this is the only way to make the place of fixing parts completely invisible. But there is one problem - it is quite difficult to accurately center the holes for the dowels. Professionals make various devices to facilitate the process, we offer you one of them.
What is required for the manufacture of a conductor
Parts are made of small pieces of wood or glued plywood, the holes are centered by pieces of aluminum tube with a diameter of 8 mm, hinges of screws. The pendulum centering mechanism is made of aluminum strips 2 mm thick, 20 mm wide and 100 mm long. The nomenclature of materials may vary depending on availability.

Manufacturing process
From a small oak log, make a bar, first you need to pass it through a thicknesser and a circular saw. The width of the strap is 18 mm.
From glued plywood 12 mm thick and 3 cm wide, make the basis for the methods. Set the stop on the table of the saw blade and prepare the parts. One blank of plywood 120 × 40 × 20 mm will be needed, marking tubes and two planks of oak 120 × 18 × 18 mm for side clamping elements are installed in it.

If the central part is too wide, then it can be narrowed with a circular. In our case, the width is reduced to 26 mm.
Cut two pieces of aluminum tube. An internal diameter of 8 mm for the size of the dowels, an external 10 mm. The length of the pieces is 20 mm and corresponds to the thickness of the central part made of plywood. You can cut the tube on a homemade machine from a jigsaw or a hacksaw for metal.

Cut two pieces of an aluminum strip measuring 100 × 20 × 2 mm.
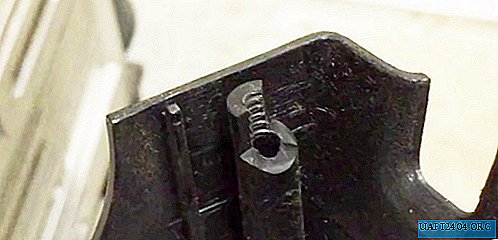
Saw a triangle-shaped sight in the middle of the center part. With its help, the position of the device is controlled. If it strayed a little - not a problem, manually correct and shift the line of symmetry (base) in one direction or another.

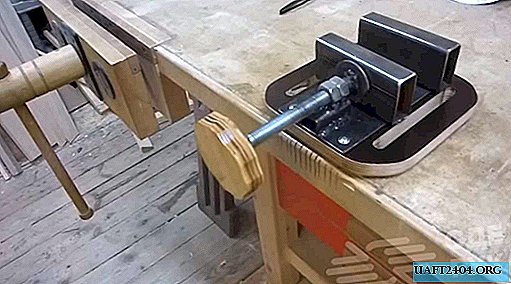
Mark the holes for the tubes, position them exactly in the middle of the part. We have a distance between the dowels of 30 mm, respectively, from the sight, each hole at a distance of 15 mm. Use a caliper and a square.

In the main part, drill two holes with a diameter of 10 mm under the tubes, press them in a vice. The tubes fit tightly; no additional fixation is required.

Drill three holes in aluminum plates with a 4 mm drill. One in the center and two on the sides at a distance of 5 mm then the end.
Countersink holes with a drill with a diameter of 8 mm. The central hole must be countersink on one side, and the side holes on the opposite. This is due to the fact that the screws are screwed from different sides.

Place the workpieces on a flat surface and assemble all parts using self-tapping screws. Do not tighten the hardware to the end, the straps should move freely, but not wobble.

First, assemble the sidewalls, and then screw them to the main center part. Check the travel of the tool.

How to use the device
Lay on the table the two parts that you want to connect. Mark the places of symmetry for two dowels for each connection (we will have four in total).
Move the marking to the side plane of the parts using a square.
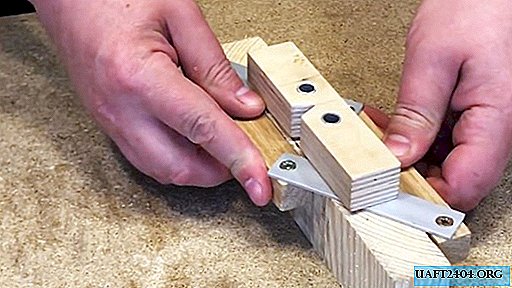
Install the fixture on the board. Align the sight with the markings, clamp the position of the conductor with clamps.
Drill holes, the guides are aluminum tubes. If the jig is made correctly, the dowels will fit perfectly.

Lay the workpieces on a flat surface and mark the location of the dowel.
Add 15 mm from the marking, this line is needed to set the sight, transfer it to the end of the parts.
Dress the conductor, put it on the scope and marks, drill holes for the dowel. Drill two parts.
Insert the dowel into the hole and connect them. Everything should exactly match.
Conclusion
The fixture is installed exactly in the center of the workpiece only if all dimensions are as strong as possible. Such devices can be made for a different number of dowels.
Share
Pin
Tweet
Send
Share
Send