When you need to dig a lot of pits in a summer cottage or household plot, many people, according to the old habit, pick up a shovel, but as practice shows, it is much easier to use a drill (mechanical, electric or fuel) for this - a simple device allows you to cover a large amount of earthwork in a relatively less time.

Functional purpose of the drill
This tool is an indispensable tool for installing a fence and street lamps, and is also used in a summer cottage and in a garden, for example, when planting cuttings of shrubs and young trees. With it, it is easier to organize a drainage system and dig a well. It is more convenient to even “make a hole” in ice during winter fishing with a screw drill, rather than with a shovel.
What types of boers exist
Non-motorized drills, mechanized manual drills (electric and fuel models) and attachments are on sale. The most affordable and picky during operation - non-motorized. They are light in weight and compact in size, distinguished by reliability and durability - due to the simplicity of the design (if desired, it is easy to make them yourself).

There are 3 types of earth moving tools:
- Garden drill - used mainly for drilling pits for planting plants and trees, but is also useful in the installation of columnar supports;
- auger - has an elongated cutting part, due to which excavation work takes less time;
- for piles TISE - the design is classic, but in addition to the knife, there is also a reclining blade, with which a characteristic expansion is formed in the lower part of the pit.
Fuel and electric manual models impress with greater productivity, but require careful maintenance and constant "breaks" in the process. Fuel drills are fully mobile, while electric drills require a nearby power source or gasoline generator. Compared to mechanical drills, electric and gas drills are more likely to fail.
Knives and mounting methods
The working parts are made in different shapes: rounded, rectangular and for spiral screws (screws). Also, homemade hand drills come with removable and non-removable blades. In the first case, steel shelves are attached at the lower end of the rod by electric welding at an angle of 25-30 degrees, and then several holes are made for fasteners (a similar operation is performed with the blades).

Connect the elements with bolts or studs and nuts with washers. “Stationary” discs are simply welded to a metal rod. For a more snug fit of the finished blades to the pipe, before installing along the edges, you first need to cut semicircular holes.
Tool performance and quality of work
The performance of a manual punch depends on the design of the product, the type of cutting element, as well as the diameter and depth of the hole in the ground. To drill a hole with a diameter of 25-30 cm and a depth of 3 meters, it will take 2-3 hours. It is problematic to perform labor-intensive work with a manual drill, but for everyday tasks it will fit perfectly. With it, you can do up to 30 holes per day - to facilitate the work, use special tripods.
If you decide to make a tool with your own hands, for cutting blades, choose only high-quality steel - in this case, the homemade product will serve faithfully for more than one year.
Do-it-yourself drill making
Using a conventional manual or mechanized pit, you can quickly and accurately drill holes in the ground for planting trees, installing poles, etc. It's just that buying an expensive power tool or gas drill to perform one-time work on the site is not practical (and sometimes a product of non-standard sizes is required). Therefore, in such situations, a manual drill for earthwork, if desired, can be made on its own.

DIY garden drill
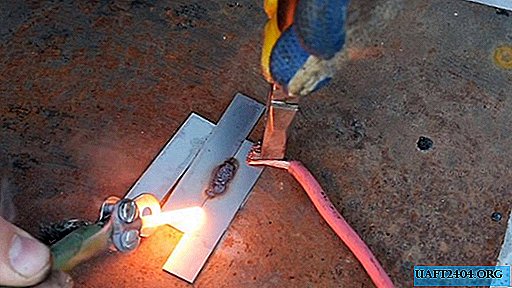
First, weld the handle perpendicular to the vertical rod, which can be used as a hollow pipe, steel bar or reinforcement. When choosing a material, consider for what tasks you make an earth drill yourself. The blades are easiest to make from a carbide saw blade - cut it with a grinder, and then weld two halves to the shaft.
Advanced earthmoving drill
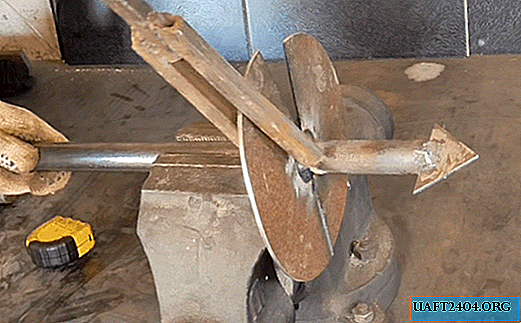
Take a square of sheet metal with dimensions of 210x210 mm and a thickness of 3-4 mm, mark the center by drawing two diagonals, and using a caliper draw a circle of the desired diameter, and then cut it with a grinder. You will also need a three-quarter pipe and a bendix from the starter.

Using a special crown or on a lathe, drill a hole in the circle for the diameter of the pipe. Weld a steel triangle to the bottom of the rod (you can use metal scraps remaining from the square), and then put a circle at a distance of 10 cm from its edge, fixing it with electric welding. In the longitudinal section of the disk, make two cuts and bend them in different directions so that the bending angle is within 25-30 °. Weld the bendix and horizontal handle to the top of the pipe. Do-it-yourself earthen auger is ready.
# 1 Bendix Earth Drill
ShareShare on Pinterest Share on FacebookShare on TwitterMore- Report