Share
Pin
Tweet
Send
Share
Send
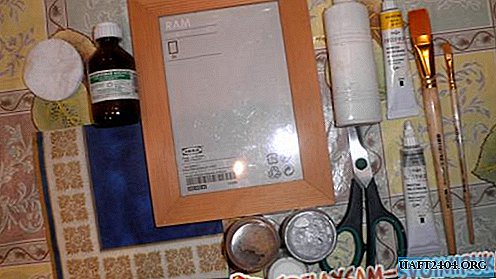
For crafts, you will need:
- wooden frame;
- napkins;
- white acrylic paint;
- glass contour;
- decoration;
- alcohol;
- cotton pad;
- glue;
- varnish;
- scissors;
- the brush is wide and flat;
- double sided tape.
First of all, you need to wipe the tree with fine sandpaper. But my frame is perfectly flat and smooth. After degreasing the surface with a cotton pad soaked in alcohol. Wait for the frame to dry.

From the napkins, cut out the patterns or ornaments that you liked most. Place them on the frame, cut off the excess. Separate the colored layer of the napkin from the white.

I have a part of the ornament printed on a white background. If I glue this fragment on a wooden frame, the tree will shine through a yellowish tinge. Therefore, if the background of the napkin is lighter than the color of the blank, then the blank must be painted in the background color of the napkin. I have it is white. There are no such problems from the blue fragment of the napkin. Use a wide brush to paint the workpiece in the desired color. Dry the paint.

Align the piece of tissue in the frame. Glue it with a brush and glue, gently stretching and aligning the napkin. If the napkin wrinkles or an air bubble forms, then lift it up and glue it back evenly. Tuck the excess edges. Do not try to crop them. The napkin easily breaks where it is not needed. Dry the glue well.

Initially, I planned to make a bright iridescent frame for a photo, but in the course of work I realized that it was already quite beautiful and concise. Therefore, I only put a few golden drops on the ornament. Color your photo frame with glass contours and acrylic paints with a metallic tint as you like. Dry the paint well. Coat the product with varnish. Dry it. If necessary, apply a few more layers of varnish.

Having examined my frame, I decided that she lacked some bright decoration. I found a snowflake in old New Year's toys. Glue your decor with double-sided tape or glue.

DIY Christmas photo frame is ready!

Creating such things is a creative process, so don't be afraid to experiment with colors, materials, and techniques as you work. Good luck
Share
Pin
Tweet
Send
Share
Send