Share
Pin
Tweet
Send
Share
Send
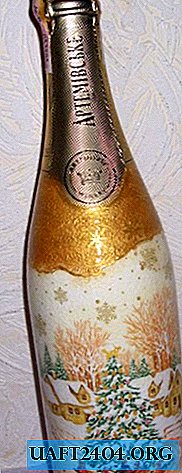
And today we will consider how beautiful it is to decorate a bottle of champagne for a festive New Year's table using the decoupage technique.
Materials that we will need to decorate the bottle:
• A bottle of your favorite champagne;
• Christmas napkin for decoupage;
• A few simple ordinary napkins;
• White acrylic paint;
• Gold acrylic paint;
• Brush for decoupage;
• Artificial brush for acrylic paint;
• Acetone;
• Several cotton pads;
• Foam sponge;
• scissors;
• Golden contour, spangles liquid and dry;
• tweezers;
• Plastic bag;
• PVA glue;
• Several containers, it is better to take glass or ceramics;
• Varnish for decoupage.

It’s better to prepare a bottle in the evening. To do this, pour warm but not hot water into the talik and put the bottle overnight. Just in the morning, the label will leave the bottle without any problems.
Wipe the surface dry. Now you need to degrease the surface of the bottle. To do this, take acetone and a few cotton pads and completely wipe the surface of the entire bottle.
Gently wrap the upper part of the bottle with the label with ordinary napkins so that it does not get dirty when painted.
Pour white paint into one bowl, take a sponge, dip it in paint and paint the surface of the bottle.


We apply the first layer, give an hour to dry the surface. Again, paint the second layer. We try not to gloss over the top label of the bottle. Again, give an hour and a half to dry.


Here are prepared drawings for decoration.


We try to keep the surface of the bottle dry, apply one drawing and start from the center to glue a napkin to the bottle.


Then, in a circle, add the second pattern and also glue it. Leave the bottle to dry.
We put the bottle on the table, take an artificial brush and paint it with gold acrylic paint in a circle around the bottom, as in the photo.


Now cut a small piece of foam sponge, take it in the tweezers. We put gold paint on the sponge and paint the bottle at the top where there was not enough napkin. It is thanks to the sponge that a pimpled surface is obtained, and if painted with a brush, then stains form.


We give half an hour to dry. Now remove the napkins.


We take a decoupage varnish and a brush and cover the surface of the bottle with glossy varnish. The top label is still not glossy. The layer dries, apply the next, and so on, only 5-6 layers of varnish. Then separately varnish the bottom of the bottle, putting it on its side. The surface is completely dry, now there are little things left. With a gold outline, we draw a nice line around the border between the napkin and gold paint, as well as accurately outline the top label. You can now draw snowflakes in gold and liquid spangles, and then sprinkle the bottle with dry sparkles.
Here you are! The festive New Year's bottle is ready and will perfectly decorate your New Year's table! Good luck and enjoy your workmanship!
Share
Pin
Tweet
Send
Share
Send