Share
Pin
Tweet
Send
Share
Send
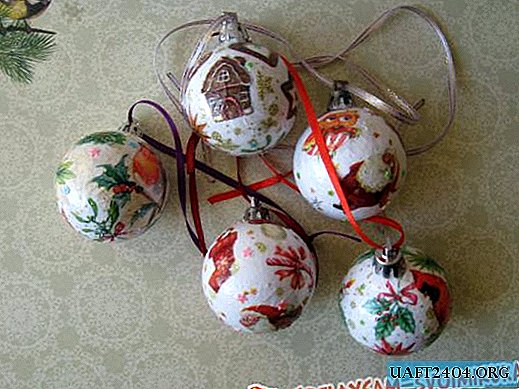
For decoupage of foam balls, you need to take:
- Five plastic balls with a diameter of 5 cm;
- Napkins for decoupage with little Christmas elements: wreaths, birds, Santa Claus, Christmas trees, houses and more;
- Acrylic white red (take the company Snezka);
- Acrylic varnish for decoupage;
- Ceramic plate;
- Foam sponge;
- PVA glue;
- Satin ribbons 3 mm wide in different colors;
- Dry spangles of white and gold color;
- Wooden sticks;
- Package;
- Scissors;
- Lighter;
- Plastic jewelry in the shape of stars.

The working surface of the table needs to be covered with a package. Remove the caps with hooks from each ball and put it aside for now. Pour acrylic paint into a ceramic plate, take a sponge and begin to paint each ball with it.


We put the colored ball on a stick and can be placed in a glass or vase until it dries. So paint all five balls.


After the first layer has dried, paint the balls with the second layer. We also put balls on sticks and set them to dry.


Meanwhile, while you can do pictures. We take different napkins, carefully remove the topmost layer from each.


And we cut off different small elements. We wash off the paint from the plate and in it we already dilute the PVA glue, approximately interfere in equal proportions.


We take a ball, put a small picture on it and carefully apply a glue mixture to the picture with a sponge.


So we stick pictures on the entire surface of the ball.


Dress on the same wand and take the next ball. So we decoupage all five balls. Now leave them to dry completely. To strengthen the picture and shine, we will now cover the balls with layers of acrylic varnish. Rinse the plate, pour the varnish. It is necessary not to spare the varnish and apply many layers, but so that each previous one dries well.


In total, we apply 5-6 layers of varnish, in the last layer you can add dry spangles and cover the balls with such a mixture. When finished, they will flicker beautifully.


We cut the ribbons of 20 cm in five segments, we burn the edges with a lighter. Dress the hats on the balls, thread the ribbons and tie knots on the eyelets. On dry balls, you can put dots with liquid glitter.


Balls in the light thanks to glitter and sparkles shimmer well, so the Christmas tree will flicker very beautifully. All balls are ready, we get such an interesting result! Thank you all for your attention.


Share
Pin
Tweet
Send
Share
Send