Share
Pin
Tweet
Send
Share
Send
The only question is how to install shoes. I propose to make a dryer from the remains of the laminate floor (simultaneously solving the issue of using scraps from laying the laminate). The advantages of this design: mounted directly to the battery on the side, and not on top; the possibility of mounting one dryer over another (in the presence of two dryers), which saves space; easily disassembled for the summer, disassembled takes up very little space. Laminate trim was used with a thickness of 8 mm. For manufacturing you will need:
- the remains of the laminate;
- ruler, pencil;
- jigsaw;
- electric drill, drill with a diameter of 8 mm;
- sandpaper, file;
- varnish or paint, brush.
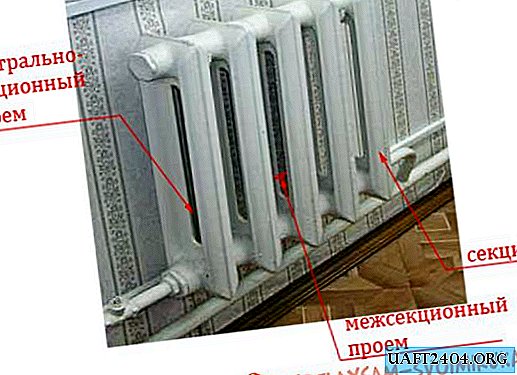
The dryer consists of two support racks, an internal locking bar, an external locking bar, two wedges and a stop screen.


To simplify the assembly, an auxiliary bar is included in the kit.

The stand-holder is the main structural element, it has a complex configuration, therefore its dimensions are given in three figures so as not to clutter the drawing. The whole structure is assembled without the use of glue and other fastening devices, such as self-tapping screws and so on. However, there are cruciform joints (half-tree pad).

Making it simple. Mark the selection in the right place. At the end of the sample in the middle we drill a hole with a diameter of 8 mm - along the thickness of the laminate. Using a jigsaw on the inside, cut out the sample.

If necessary, customize the file.
Laminate has a durable waterproof coating on both sides, however, cuts swell under the influence of water and ruin the structure. Therefore, all cuts must be painted over or varnished.

Since laminate fasteners do not play any role, we do not pay attention to it.
Getting to the assembly. Auxiliary bar connect with racks.

Holding with one hand the auxiliary bar we push the lower C-shaped parts of the racks into the first and fourth intersectional openings, counting from the edge. With the other hand, we install the internal locking bar through the central sectional opening so that it enters the C-shaped grip.

We pull on the auxiliary bar and install the outer locking bar on top.

While the dryer is moving, we determine its place at will by movements up and down. Set the wedges.

We remove the auxiliary bar. We insert the screen emphasis.

Between the screen and the battery, a space is obtained where it is convenient to insert the shoes with the toe down.


If it seems to you that the boot does not fit snugly against the battery, you can remove the screen and put it closer by resting it on the holders.
Share
Pin
Tweet
Send
Share
Send