Hello! Today I received another package from China, which contained this universal temperature controller, which I had previously ordered. I especially liked this model, as it has obvious advantages over other Chinese models, which I need as a craftsman.


Well, actually we will pass to pluses:
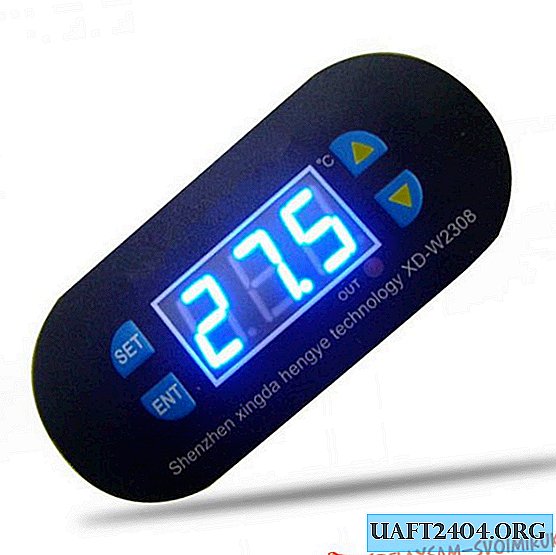
- the first is a larger and brighter character display, the numbers of which are quite clearly distinguishable even from a long distance.
- the second is the minimum size. Regulators in their enclosures often cannot be integrated into compact devices because of their size.
- the third, unlike a simple board, this model has its own fake panel and I just have to cut a window in the installation object and that’s it. Then everything is twisted with screws, a false panel is glued on top. It looks very beautiful and aesthetically pleasing.
- Fourth, this is the presence of a zoom that gives an audio signal when a specified level or a preliminary level set in the settings is exceeded.
All these advantages made my choice in favor of this regulator. Oh yes, I almost forgot: this model has more flexible tuning ranges, which may be needed by fastidious or demanding users.
Well, let's move on to the characteristics of this device:
The supply voltage is 12 volts. And here again, this model has a plus - you can power the board with both direct and alternating current. At the input there is a diode and smoothing capacitors, then comes the stabilizer.
The universal digital controller maintains the set temperature in the range from - 55 to + 120 ° C, with an accuracy of 0.1 degrees Celsius. Naturally, all limits are set.
The output of the regulator is relay contacts with a load capacity of 10 amperes and a switching voltage of up to 250 volts. Relay contacts are isolated from the main circuit i.e. the regulator is galvanically isolated from the voltage of the power circuit and the control circuit.
The controller has a measurement error of only ± 0. 5 ° C, which is enough for a bit temperature control.

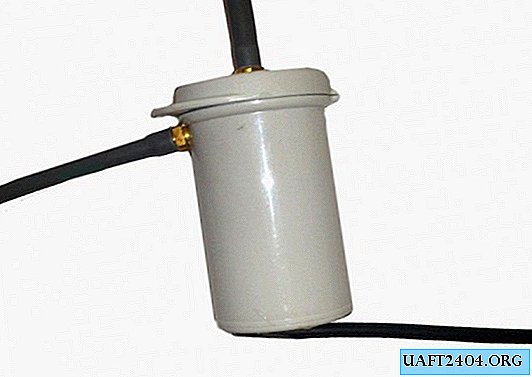
The temperature sensor is tight and can work in humid environments or even in water if you intend to use a regulator, say, to measure the temperature of the water and heat the aquarium.
So we quietly got to the use of a digital controller. The device can be used for: terrarium, incubator, aquarium, freezer, refrigerator, various industrial coolers, stoves and boilers, thermostats. Just a huge field of opportunities where this regulator can be involved.
Personally, I used this knob to control the cooker hood. The sensor secured in the retracting zone above the stove, set the response to exceed 28 degrees, hysteresis, or the on-off difference set to 2 degrees. Now when you turn on the gas burners, the heat rises, and the hood turns on. The hood turns off when the temperature drops to 26 degrees. Here it is! It's simple, but how convenient))) Now it has become a pleasure to use.
If desired, of course, the regulator can be installed in the housing of course - it's all for everyone.
Now it is time to consider switching schemes. According to the manual that is included in the kit, there are two of them:
The first diagram shows the inclusion in the low-voltage circuit and the control of a 12-volt load.


Which scheme to choose is up to you to decide: If your load is low voltage, for example, controlling computer coolers, then the first, and if the high voltage, say, a heater, then the second.
Personally, I will choose the second to show the controller in operation.
Well, I put together a diagram.

I turn it on. Initially, the controller is turned on and displays the temperature of the sensor. If the message “LLL” appears on the display when turned on, this means that the sensor is not connected or not working. If you need to turn off the regulator, then press "ENT" and hold for 2-5 seconds until the regulator turns off. You can turn on the device by briefly pressing "SET".
As you already noticed - all clicks are accompanied by short-term sound signals, which is very convenient.
To set the temperature that will need to be maintained, briefly press the "SET" key. Use the up and down arrows to set the desired temperature, and then briefly press "SET" or "ENT" to return to its original state. All - the temperature is set and the controller will maintain it. I set the temperature to 27 degrees, now I will heat the sensor by hand and the light should light up, indicating that the device is on. Let's check.
The light comes on! While I turn out the light so that it does not blind. The regulator is working.
Let's deal with the settings:
To enter the parameter settings menu, press and hold the "SET" button for about 5 seconds until the inscription "P0" appears. P0 is one of the menu items. Now, using the "+" or "-" buttons, you can select any menu item from P0 - P8. The meaning of the menu items is shown in the table below. Having selected the item, enter it with the "SET" key. Using the "+" or "-" buttons you can set the values you need.
Menu item | Description | Range values | Factory setting |
P0 | The operating mode of the thermostat: "C" or "H" (the relay is activated when it is exceeded, or disconnected when the set temperature is exceeded). | "C" or "H" | FROM |
P1 | Hysteresis setting. | 0,1 - 30 ℃ | 2.0 |
P2 | The upper limit of the adjustable temperature. | +120 ℃ | +120 ℃ |
P3 | Lower limit of adjustable temperature. | - 50 ℃ | - 50 ℃ |
P4 | Temperature correction. | -10 ~ +10 ℃ | 0 |
P5 | Time delay when the relay is turned on. | 0 - 10 min | 0 |
P6 | Upper alarm limit. | - 50 ℃ ~ +120 ℃ | Off |
P7 | Lock settings. | ON-OFF | Off |
P8 | Reset to factory settings. | ON-OFF | Off |
Now let's go through the points:
P0 - operating mode of the thermostat. If you set "C", then the controller will close the relay contacts when the temperature exceeds a predetermined level, this is how it is now with the light bulb. These are terrariums, aquariums and others, where it is necessary to heat control objects. If you set "H", then the relay contacts will open when the temperature exceeds the set level. This is necessary for refrigeration units in the first place.
P1 - setting the hysteresis, as I said: this is the temperature difference between switching on and off. By default, the hysteresis is 2 degrees, that is, if the maintenance temperature is 30 degrees, the controller will turn on at 30 degrees and turn off at 28 degrees. The minimum hysteresis value is 0.1 degrees Celsius. The lower this value, the more often the thermostat turns on and off.
P2, P3 - well, an example will help here: you need to control, say, a heater in a boiler. Naturally, the upper chapel cannot be set above 100 degrees - otherwise the boiler does not turn off, since the water temperature cannot exceed 100 degrees. And you need to limit the temperature selection band to about 10 to 90 degrees. This is where points P2 and P3 are needed, which set the upper and lower limits of the range adjustment.
P4 - Of course, the Chinese accurately calibrate their sensors and devices, but if you suspect that the regulator does not accurately show the real temperature, you can enter correction values that differ from the readings with the reference thermometer, thereby calibrating it.
P5 - It's simple: this is the time delay before switching on. If the tripping value has reached the threshold, a timer starts, after which the load starts. The time delay can be set from 0 to 10 minutes.
P6 - Alarm threshold. The temperature after which a beep will sound.
P7 - Lock settings: if its value is set to ON, then you cannot change any settings in the controller until you set the value OFF to "P7".
P8 - Reset to factory settings. The factory settings are shown in the table in the last column. This is sometimes necessary when you have knocked down all the settings and you need to restore the initial values.
After selecting and entering all the settings, to apply the parameters, press the "SET" button to exit with saving in the selection menu P0-P8, or the "ENT" button to exit with saving to the main temperature display state.
In addition to the indicator on the device’s panel, there is an LED that indicates closed relay contacts.
The regulator is stable and reliable in operation. All settings are saved in non-volatile memory and are not reset when the power is turned off.
The kit includes:
- Temperature controller - 1 pc.
- Temperature sensor - 1 pc.
- Operating Instructions - 1 pc.
- Screw - 6 pcs.
- Nut - 6 pcs.
- Plastic extension - 4 pcs.
- Panel - 1 pc.
- False panel with marking - 1 pc.


That's all! Feel free to order this regulator at the lowest price - a link in the description. Why at the lowest? Yes, because I spend a fair amount of time in order to find the lowest-priced option and only with trusted users, after having read all the reviews.
You can buy it here - //ali.pub/4sfgh
Well, I say goodbye to you. Thanks for watching this video. I will be very grateful if you like this video. If you have questions - write, I will be happy to answer them. Subscribe to the channel. All the best to you! Goodbye!