Share
Pin
Tweet
Send
Share
Send
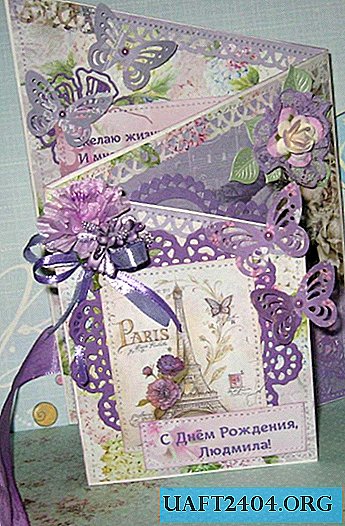
For the manufacture of postcards we take:
- Watercolor paper 22 cm by 40.5 cm;
- Lilac scrapbook paper, two sheets 30 * 30 cm in size from the Happy Day collection;
- Pictures with different flower arrangements, butterflies, Eiffel tower;
- A greeting poem printed on a lilac background, as well as the inscription "Happy Birthday, Lyudmila!";
- Cut elements: Butterflies, flowers, leaves, napkin, hearts, all in lilac-purple;
- Curb hole punch;
- 3-D hole punch butterfly;
- Half beads pearl beige and lilac;
- Lilac lace;
- Satin purple ribbons 3 mm and 5 mm wide;
- Stamens in bouquets are lilac;
- Flower lilac tissue cornflower;
- Middle with rhinestones of lilac color;
- Lilac ribbon 25 mm wide from satin;
- Paper white-lilac rose;
- Lilac paper hydrangea;
- Glue stick;
- Ink pink pad;
- Thermal gun;
- Double-sided tape;
- A simple pencil;
- Ruler and scissors.

We lay out watercolor paper and divide it into appropriate sizes. We leave 22 cm in height and divide it into parts by 15 cm, 15 cm and 10.5 cm from the top and bottom in width. On the right side we divide in half the 11 cm side.


Now we connect the upper left corner and connect under the ruler with the right side in the center. Draw a solid line.


We also connect the upper and lower points under the ruler and draw bending lines. Cut off the upper wedge.


Fold in half from right to left, and now again from left to right.


Thus, we have got such a complicated folding base. Cut two strips of tape 25 mm wide.


Glue the back of the base with pieces of double-sided tape. So she will then be tied to a bow. Now we extinguish the entire base along all the edges with a small pillow.


Now we take a scrapbook paper and cut off two such quadrangles for each side of the card.


We make strips from the remains of paper with a border punch. Glue these strips on top of each quadrangle. Now we take pictures, cutting down, verses and an inscription and we lay out on five quadrangles. Sixth, we simply glue the double-sided tape on the back of the postcard back.


Sew on a typewriter all our clippings. Now we glue all the scrapbook quadrangles to the base with double-sided tape.


Stitch from the front, after folding, each side of our postcards.


Fold, tie to a bow. Now we have the remaining touches, just glue the decor. From lace we make a flower, punch butterflies and decorate our card, gluing all the elements with a thermal gun.


Done, here is our unusual and beautiful result. Postcard and tender and bright. Thanks for your attention! Good luck to all.

Share
Pin
Tweet
Send
Share
Send