Share
Pin
Tweet
Send
Share
Send
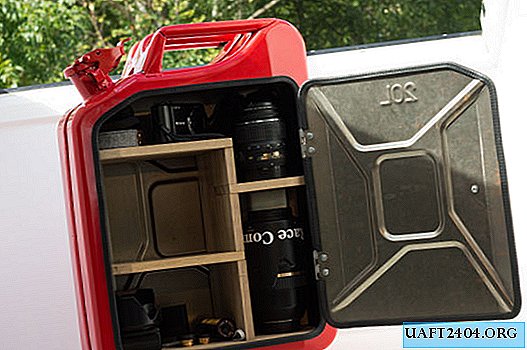
On sale you can find a variety of things made by skilled people from improvised means. For example, a very interesting idea is a canister converted into a bar cabinet. It looks impressive and costs the same. At the same time, you can do such a thing yourself, so that it satisfies exactly your needs and requirements. In bars, the door usually opens down, which may not always be convenient.
Below is an instruction on how to make your own cabinet from a canister with shelves adjustable in height. The location of the shelves depends on the purpose for which the cabinet is intended, for example, the combination below is suitable for photographic equipment, however you can adjust it to your needs.
Necessary materials and equipment
To work, you need the following:
Materials:
- Old washed or new canister.
- Boards.
- Hinges.
- A pen.
- Rubber compressor.
- Screws, bolts and nuts.
Equipment:
- Dremel with a cutting disc.
- Angle grinder with a cutting disc (grinder).
- Band saw (or jigsaw).
- File.
- Marker pen.
- Angle ruler (optional, a ruler is also suitable).
- Sandpaper.
- Plane.
- Bench drill or drill and drill.
Decide on the size of the door


Before you start cutting a door in a canister, it is worth deciding what size it should be. Using a marker attached to the square, you can mark the doors of different sizes and choose the most suitable. In the above example, it is 30 mm from the edge of the canister.
In order not to accidentally erase the line drawn with a marker, you can stick it with a translucent adhesive tape, and draw a thinner line on top of it with a pen that makes it more convenient to cut.
Cut out the door


The door can be cut with a dremel or a grinder.
The second option may be faster, while the grinder leaves a wider slot, because she has a wider drive. Since it is planned to stick a rubber seal on the door and the edges of the opening, this would be a more suitable option. When working with a grinder, you will likely need help to fix the canister.
At the final stage, it is more convenient to use a dremel to cut rounded corners. When cutting metal, you must be very careful with sharp edges in the cut. Use gloves and file the edges.
Door rubber seal and fit


Glue the rubber seal on the edge of the door and check that the door is snug. If necessary, cut and adjust the angles with a dremel and a file.
Determine the size and location of the shelves inside the canister


Now you need to make the internal shelves for the cabinet. Depending on what you plan to store in it, think over its design. The picture shows the layout suitable for photographic equipment, while the whole structure can be further disassembled and remade, since the lock connection is used for assembly.
The internal dimensions of the canister may vary slightly depending on the manufacturer, so you better start from your own measurements. To simulate the end result and imagine how it will look, you can use a design program like Autodesk Inventor.
Make shelves


First of all, sand the boards. In this case, the boards were 12 mm thick. Then, using the templates, mark the parts for the shelves on the boards. To cut them, it is best to use a band saw. Because this canister has a recess in the middle along the narrow side, in the shelf it was necessary to cut a hole with a drilling machine. Drill also a hole for connecting to the support posts in each corner, 6 mm from the edges with a width of 3 mm and a depth of 8 mm. When fastening a shelf with a clip, put a piece of wood between the clip and the shelf itself so as not to damage it.
To precisely fit all the parts to each other and to the size of the canister, careful grinding of the edges and joints is required. Remember that sanding is best along wood fibers.
Finally, you need to cut vertical racks. To connect to the shelves using dowels, make holes at the ends of the columns 12 mm deep, 3 mm in diameter (then the fastening should be 20 mm in length).
Door preparation and installation


Find the hinges that fit your design. After measuring the width of the loops and determining where you want to attach them, make a mark using a nail or something else sharp. One of the options: loops at a distance of 15 mm from the edge of the canister, at a height of 100 and 270 mm.
In order not to make a mistake with the location of the hole, start drilling using a thin drill, preferably 1 or 2 mm in diameter, and then install a thicker one that matches the purchased bolts.
Install the hinges and trim the seal if necessary. Now it is easy to determine the location of the holes on the door by attaching the door and placing it in the desired position. Drill holes on the door as described above and fasten the hinges on it.
Last but not least, fasten the doorknob to the desired location. In this case, it is set at 45 mm from the edge and 180 mm from the bottom edge of the door.
Shelf assembly


Finally, you need to assemble the shelves for the cabinet. It will be easy or difficult depending on how intricate the design you come up with.
Fill the locker and enjoy


Decide where you will store an amazing locker. The most important thing, of course, is to find a place where it will be in sight, and you will be able to proudly demonstrate the creation of your hands to everyone.
Original article in English
Share
Pin
Tweet
Send
Share
Send

