Share
Pin
Tweet
Send
Share
Send
You will need:
- - nutshell;
- - a vibrating alert motor from any working or non-working phone;
- - small slide switch;
- - two AG13 format batteries;
- - syringe 5 cm cubic as a battery compartment;
- - a little wire;
- - soldering iron and solder (preferably);
- - hot glue;
- - nail polishes or paints.

The vibration motor can be removed from any idle phone, since they themselves break extremely rarely. Surely you or your friends will find a telephone whose repair is no longer practical. Such a motor has two outputs and its polarity does not matter, i.e. it makes no difference where to connect the plus and where the minus.

The first wiring is soldered to one of the motor contacts and the central contact of the switch. Such switches are installed in almost all Chinese toys with batteries. If suddenly you could not find anything similar at home, then you can buy it in a radio parts store.
It is really possible to do without a soldering iron: just carefully wrap the wires to the contacts and fix them with hot glue, but then the connection will not be as reliable as when soldering.

At the syringe, cut off the nose and shorten it so that two batteries fit.

For good contact of the batteries with the wires, it is enough just to press them well and fix with a small amount of electrical tape or adhesive tape.

Now you should solder the wires coming from the batteries to the free contact of the motor and any of the extreme contacts of the switch. That's all the electronics of our autumn crafts.


Everything should fit inside the shell. The motor should be laid in the part where the "head" of the ladybug will be. Make sure that no parts protrude beyond the lower plane.
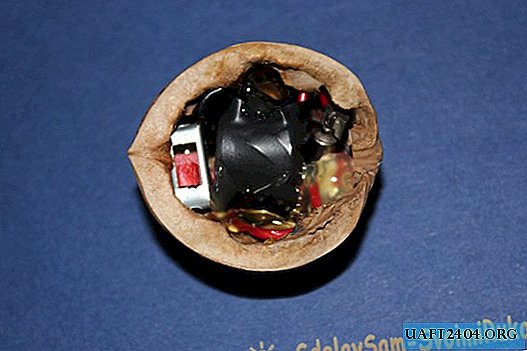
When everything is set, and you are convinced that the motor is working, you can fix the parts with a small amount of hot glue.
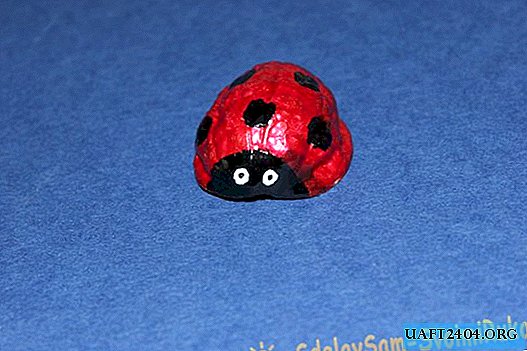
Coloring is very simple. First, cover the shell with a layer of red varnish. Then, with black varnish, draw our ladybird's head and dots. When everything is dry, you can draw eyes.
We guarantee that your kid’s fall crafts will surprise and delight both children and teachers. Such a ladybug is moving very funny.
Watch the video of the robot
Share
Pin
Tweet
Send
Share
Send