Share
Pin
Tweet
Send
Share
Send
For example, you need to chain several batteries. They are connected with a thin metal tape, without soldering, because the batteries do not recommend soldering at all. For such purposes, I will show you how to assemble a simple machine for spot contact welding with your own hands in about 30 minutes.
- We need an AC transformer with a secondary voltage of 15-25 Volts. Load capacity does not matter.
- Capacitors I took 2200 microfarads - 4 pieces. You can do more, depending on the power you need to get.
- Any button.
- Wires.
- Copper wire.
- Diode assembly for rectification. You can also use one diode, for half-wave rectification.
Scheme of the apparatus for resistance spot welding
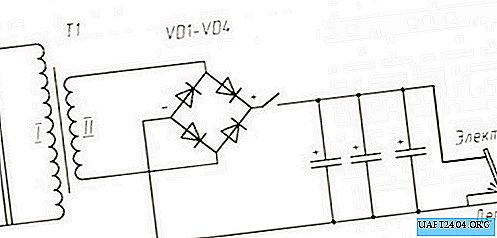
The operation of the device is very simple. When you press the button that is installed on the welding plug, the capacitors are charged up to 30 V. After that, the potential appears on the welding fork, since the capacitors are connected in parallel with the plug. In order to weld metals, we connect them and press them with a fork. When the contacts are shorted, a short circuit occurs, as a result of which sparks slip and the metals are welded together.

Welding machine assembly


Solder the capacitors together.
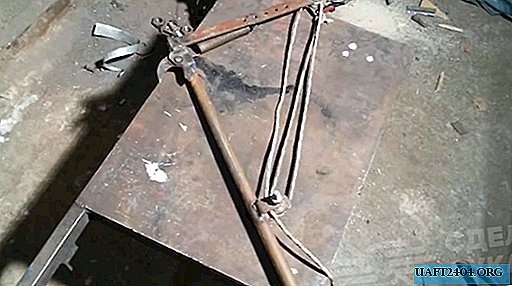
We make a welding fork. To do this, take two pieces of thick copper wire. And solder to the wires, isolate the place of soldering with electrical tape.
The plug body will be an aluminum tube with a plastic plug through which the welding leads will stick out. So that the output does not fail, we put them on glue.


We also put a plug on the glue.


Solder the wires to the button and attach the button to the plug. We wrap everything with electrical tape.


That is, four wires go to the welding plug: two for the welding electrodes and two for the button.
We assemble the device, solder the plug and button.

Turn on, press the charge button. Capacitors are being charged.

We measure the voltage across the capacitors. It is approximately equal to 30 V, which is quite acceptable.
We try to weld metals. In principle, tolerant, given the fact that I took not entirely new capacitors. The tape holds pretty well.


But if you need more help, then you can modify the scheme like this.

The first thing that catches your eye is a larger number of capacitors, which significantly increases the power of the entire device.
Further, instead of a button, a resistor with a resistance of 10-100 Ohms. I decided that enough with the button to indulge - everything charges itself after 1-2 seconds. Plus, the button does not stick. After all, the instantaneous charge current is also decent.
And the third is a choke in the chain of the plug, consisting of 30-100 turns of thick wire on a ferrite core. Thanks to this inductor, the instantaneous welding time will be increased, which will increase its quality, and the life of the capacitors will be extended.
Capacitors operating in such a resistance welding machine are doomed to early failure, since such overloads are not desirable for them. But they are more than enough for several hundred welding joints.
Watch the video build and test
Share
Pin
Tweet
Send
Share
Send