If you were lucky enough to get a piece of a railway rail, then you can make an anvil from it for a home workshop. Due to its compact size, it does not take up much space, and it is definitely useful in the household.

Depending on what piece of rail you have, the dimensions of the future anvil are determined. If the rail is very rusty, then it will not hurt to clean it of traces of corrosion.
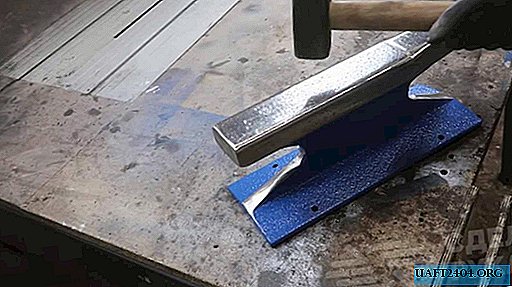
Next, the master makes a marking, and on a drilling machine (using a crown) drills two holes of the desired diameter. Then the grinder needs to cut off all the excess, giving the workpiece the shape of an anvil.

The main stages of work
At the next stage, it will be necessary to polish the cut points with a grinding (flap) wheel for angle grinders to smooth the edges and remove burrs. At the bottom of the rail, the master drills four holes with which the anvil will be attached to a wooden deck.

After this, it remains only to clean the surface of the anvil with a cord brush and paint it with spray paint from a spray can. First you need to glue the working part with masking tape.

Then the anvil is mounted on a wooden deck. The height of the anvil above the floor in the workshop is determined individually - to whom it is more convenient.

The detailed process of making anvil from the rail can be found in the video on the website.