Share
Pin
Tweet
Send
Share
Send
The most important knitting loops
There are two main types of loops, which you need to master at the stage of mastering knitting - facial and wrong. They are the basic elements for the compilation of any kind of canvas: shawl - consists of rows connected only by facial loops; smooth - consists of alternating rows of seamy and facial loops; elastic (elastic) - consists of successively alternating front and back loops in the same row; openwork - knitting, one row of which is made of a combination of facial double loops and yarn, and the other is knitted only with purl loops; relief (with braids) - consists of alternating stripes of the front and back surfaces, while in the same row the front elements are periodically crossed or intertwined; flat fantasy - is a pattern consisting of systematic sections of the wrong side and front surface. Finally, without the ability to knit front and back loops, novice craftswomen will not be able to master the creation of multi-colored knitted patterns, which are known as Norwegian or Nordic motifs in the form of stars, deers, snowflakes and flowers.
In a word, knowing how to knit only front and back loops, you can create real needlework masterpieces that, in addition to aesthetic pleasure, will give the owner of a knitted thing warmth in his usual sense, and a sense of comfort.
Front loops - how to knit them
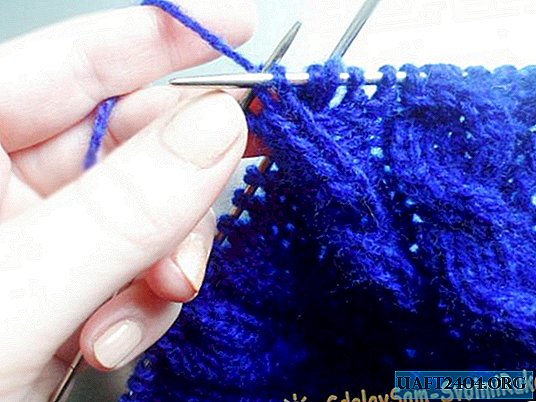
The first loops with which you need to get to know the novice craftswoman are facial. Making them is very simple - for this you need to have more or less developed perseverance and attentiveness. So, before us are the knitting needles with the loops, the working thread is placed behind the future canvas. To knit the facial loop we perform the following manipulations:
1. The working needle is introduced into the loop from the front edge (the one that is closer to the knitter).
2. We cling the needle to the working thread in the direction from top to bottom.
3. We stretch the loop of the working thread through the loop on the spoke.
And now the first front loop is ready - it is located on the right knitting needle (working) and is indicated by a red arrow, and the loop on the left remains, which is about to become an element of the previous row (indicated by a blue arrow). It must be dropped from the left knitting needle so that the work moves forward.

The following operations are performed with each loop in a row. If you knit the second, third, and all subsequent rows only with front loops, you get a classic shawl.

Of course, to create real masterpieces with knitting needles, only facial loops will not be enough for a knitter, therefore, after mastering them, you can safely proceed to the study of purl loops.
Wrong loops - technology of their creation
The purl loops are a mirror image of the front loops, and therefore the master who mastered the previous type of knitting will not have difficulty. The initial position for knitting such loops is actually the same as when knitting a scarf cloth, but the working thread is thrown to the front of the work, closer to the craftswoman.

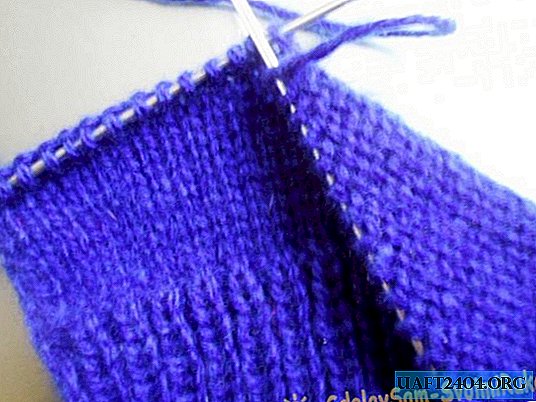
The working needle is inserted into the loop of the previous row from the rear edge (see photo). Next, the thread is captured by the working knitting needle, and stretches through the loop of the previous row.

In the photo, the red arrow indicates the connected inside loop. It must be left on the right knitting needle. The blue arrow indicates the loop, which after pulling the working thread must be removed from the left knitting needle.
If you knit all the rows only with purl loops, the fabric will look the same as when knitting with the front - you get a classic garter stitch.
Combinations of front and back loops
After the front and back loops are mastered quite well, you can start combining them. This will allow to obtain knitted fabrics of different structure and characteristics.
Facial and wrong side
The most common combination of front and back loops can be seen in a smooth canvas. This canvas can be connected if you alternate the rows of front loops with the rows of purl.
Its front part looks like pigtails pressed to each other. It is the front surface that is used when knitting multi-colored patterns.

The seamy side of such canvases is completely covered with “lamb” loops. This kind of fabric can often be seen only on the wrong side of knitwear. However, in some cases, it is used as a facial base when tying braids.

Smooth fabric is considered the most dense among other types of knitted fabrics. However, he also has disadvantages - the edges of the products connected by the surface are curled.
Elastic band or elastic band
This type of knitting is used to decorate the edge of the knitted thing, as it has increased elasticity and perfectly sets the shape of the entire product. The elastic fabric pattern is alternating strips of front and back smooth. They can be of various widths. The most popular among knitters are gum 1: 1, 2: 2, 2: 3, 3: 3, where the first number corresponds to the number of facial loops, and the second to the wrong ones in rapport.
This is how the simplest and most viscous gum looks, connected according to the 1: 1 scheme.

It is used to design the bottom of the product, neckline, cuffs. It also makes excellent belts that do not curl even after washing.
The elastic band connected according to the 2: 2 scheme looks a little different - its strips are wider. This fabric has less elasticity than the previous version, but it is very often used to design the necks, cuffs, as well as to highlight the waist line on elongated products.

Textured knitting - flat and embossed patterns
Getting a textured, that is, artistically designed knitted fabric - that is why for the most part they start to get acquainted with this type of needlework. It can be flat or embossed, complex or relatively simple, but in any case, to create it, you will need to master almost perfectly the technique of knitting the front and back loops.
The easiest textured knit to play is flat. Moreover, certain sections of the canvas represent the wrong side, and others - the front surface. The most common example of a flat textured knit is the Chess pattern (see the following photo), connected according to the 3: 3 pattern with a change of order through 3 rows.

The main advantage of such patterns is the ease of creation and the ability to create exclusive patterns.
Another option for flat textured knitting is the "Rice" pattern. It is knitted according to a 1: 1 pattern (front loops alternate with wrong ones in each row). In fact, this pattern fits in the same way as a 1: 1 elastic, but in each row the purl loops need to be knitted over the purl, and the front ones - over the front ones.

A little more difficult in terms of labor is given to knitting relief patterns - braids, interwoven stripes. The main "field" in this knitting is the wrong surface, and the protruding (convex) elements are knitted with the front surface. To get a really embossed pattern, the craftswoman will need additional knitting needles. With their help, you can change the direction of the element.

To get the same braids as in the photo above, knitting starts according to the scheme for a 2: 4 gum. The wrong side will be narrower, and the front, respectively, wide. Having knitted several rows, they carry out the crossing of the "pillar" of facial loops. To do this, when working on the front side, 2 of 4 loops are removed on the auxiliary knitting needle and left in front of the canvas, and the remaining two loops of the element are knitted with facial loops.

Then, the loops removed on the auxiliary knit (also facial) are knit. So do with every scythe.
Then the cycle is repeated several times until the craftswoman fulfills her creative ideas.
Another area of application of the front and back loops is the creation of openwork patterns. They are rightly considered the most difficult milestone for knitting, since their patterns consist of a combination of facial loops connected in odd rows, and purl loops in even ones. In fact, openwork is a great way to give things lightness and a special charm, as holes appear on it.
To create a classic “mesh”, the yarn and two loops connected together are alternated. To create more complex patterns, the front surface is included in the scheme. If you divide the yarn and double the loops with several loops of a look, you can get a beautiful effect of oblique or inclined knitting. We will talk more about this technique in another article.
Pleasant creativity, a lover of knitting needles and knitted masterpieces!
Share
Pin
Tweet
Send
Share
Send